Posts

Showing posts from January, 2013

Snow Days

Image
Well I finally decided to start working on my family scrapbook. I have taken a pretty long break from layouts, only here and there. But, it's about time to start catching up, and yes I now have a lot of catching up to do. However, I've had fun with the break as I've been taking part in design team challenges creating paper projects, cards, and a couple layouts.  So, here is a layout featuring my two kids playing with their neighbor in the snow. This layout actually happened to fall under some challenge categories so I decided to enter it in some challenges. You'll see the challenge entry list at the bottom of this post. To create this layout I used the Winter Woodland Cricut Cartridge for the Snow Day title and I used the Winter Frolic Cricut Cartridge for the Snow Much Fun title as well as the sleds sitting on the circles and the snowman between Snow and Day. I embellished my layout using some red and white twine (one of my newest favorite ways to embe

Love Is In the Air

Image
This weeks challenge at Cut It Up is all about love! The challenge is to create a project for Valentines day and the only rule: Make sure you have a diecut. For my card I used a new cartridge that I recently acquired and have wanted for quite awhile. Using my gyspy I welded together the girl pushing the buggy from the Kate's ABC's Cricut Cartridge. I cut out the cat on the front of the card and replaced it with a heart, but I left the cat on the back of the card. I hope you enjoyed my project now it's your turn to upload your project to  Cut It Up !

Music To My Ears

Image
This week's challenge at  the  Fantabulous Cricut  blog is all about music!  It's simple just use a diecut and incorporate music on your project. To make this card I used my embossing machine and then used some diecuts cut from the A child's Year Cricut Cartridge. Cute and simple. Now it's your turn!

DVD/Card Cover Tutorial (Repost)

Image
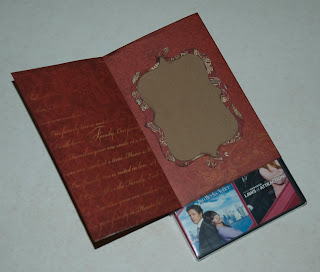
I give out quite a few DVD's as gifts for birthdays as well as Christmas. This year, I decided to send a dvd to my grandmother in California. I wanted it to be a little more special than just sending a dvd and a card. So, I came up with this dvd cover and added a card to the front to create a dvd cover and card in one. You can also view this tutorial over at the  Fantabulous Cricut blog  for their Thurday Tutorial! Materials 2 pieces of 12x12 pattern paper Adhesive Embellishment DVD DVD Cover 1.       Cut one piece of 12x12 to 7 ¾ x 12 2.       Score at:     ½” 5 7/8” 6 3/8” 11 ¾” 1.       Fold your score lines 2.       Add adhesive to back the ¼ fold (or use tape as this will be cover up) 3.       Use your DVD box to secure the cover at adhesive line. (this is the point at which you would use tape if you wanted to)  Note: this is a tight fit Cover/Card 1.       Cut the other 12x12 paper down to 7 ¾ x 6 ¾ 2.       Score at:    

In With The New

Image
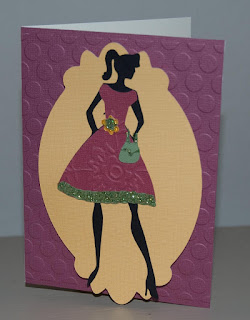
Well it's a new year already, wow that came fast!  The next two weeks the Cut It Up blog challenge is all about the "New". Your challenge is to create a paper project with a new crafty item that you got for the holidays. Didn't get any crafty items? No worries, use something from your stash that you bought and haven't used yet. Don't forget the diecut!!!! My mother got me some new embossing folders so I made these cards using the Forever Young Cricut Cartridge and embossed the base papers as well as some of the girls dresses. The embossing folder that was used above is one of the new mini folders that my mom gave me.  Now it's your turn, what new crafty item did you get (or buy for yourself)??? Upload it to the  Cut It Up  blog

My First Attempts At Clothes

Image
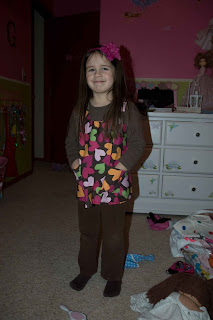
I decided that I should just go ahead and try a simple shirt. It seemed the easiest to start off with a shirt for Grace. Jo Ann's had recently had a .99 sale on their McCall's patterns so I stalked up, because well why not???? I got one out and started working! Front View Back View It was a bit wide for here (done on purpose so it would fit for awhile) but I decided to gather the top and sew it with some pretty heart stitching (you may not be able to see that in the photo). By gathering the material it made the shirt fit much better and made it cuter as well! I made this shirt from a piece of remnant cloth that I got from Joann's. It didn't turn out too bad and she even wore it to school! Since that was a fairly successful endeavor, I decided to go ahead and try something for me.  I only have one pair of capri sleepwear pants for the summer and I'm always wishing I had more so that is what I decided to start with. BTW: softe

A New Hobby for a New Year!

Image
Look what my husband got me for Christmas this year!!! \ And here is my very first sewing project! A cover for my sewing machine. I followed a tutorial that I discovered off  Pinterest .  You can go directly to the tutorial by clicking  HERE . And, you will notice that I simplified things by not using the different pattern material to make three sections. Being my first project I didn't want things to be too complicated!

Tag Layout

Image
Happy New Year  and welcome to the first challenge of the year 2013 at the  Fantabulous Cricut blog! This week we are asked to create a project using a tag, Check my project out! I decided to create a layout using tags. I don't have pictures yet, but it's all ready for them. All the tags along the bottom of the layout come from the Winter Woodland Cricut Cartridge. Now it's your turn to upload your project to the  Fantabulous Cricut  blog!