Posts

Showing posts from September, 2017

Summer Love

Image
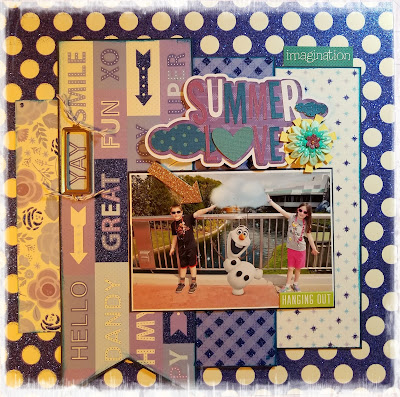
Walt Disney World is full of magical opportunities. When you get your picture taken by the Photographers, sometimes they add a little magic into your pictures. Check out the bit of magic we ran into! I created this layout to go with a challenge at A Cherry on Top . The challenge was to use an arrow, metal of any kind, flowers, papers, and a word title.  To Create this Layout I used: Papers: DCWV - The Marquee Stack Arrow: Mambi Chips Chipboard Sticker - glitter arrow Metal: metal frame from my stash Word Title - Miss Kates Cuttables Twine And now for a closer look! This is another layout I completed for a different challenge within the same forum. To Create this Layout I used: DCWV: Dots, Stripes, and Plaids paper stack Etsy seller SVGCooP - Title and Space Mountain building diecut Cricut Design Space Shapes - stars Me & My Big Ideas - Mambie Chips: Chipboard stickers - arrow & "good times" Me & My Big Ideas -

Ariel's Under the Sea Adventure

Image
Got some more scrapping done this weekend. I've been working like crazy on my Disney World album and some pages go slower than others. The following layout did take awhile but that is because of all the intricate disney die cuts. Check out the layouts below! To create this Layout I used: DCWV: Violet Leaf  Paper Stack Maya Road: Chipboard covered in washi tape Disney Princess Dreams Come True Cricut Cartridge: Sebastian, Ariel,  Flounder, castle Picturesque Cricut Cartridge: tag Font: Quirky Script Krafty Nook SVG: Little Mermaid Esty Seller SVGCooP: Title InstaScrap: Beauty Puff Stickers - photo corners, glamerous, and arrow Washi Tape And now for a closer look: Thank you so much for stopping by! Blessings,

Having Fun Layout

Image
I recently discovered a great forum that holds monthly crops and challenges. I am always looking for inspiration and I love the challenge that challenges give me! Ha ha ha. Well, this forum is called  A Cherry on Top  and not only do they have their message boards but they are an online shop as well. One of their challenges is one of my favorite type of challenge, a sketch challenge. The sketch turned out perfectly for our pictures outside the Under the Sea: Journey of the Little Mermaid ride.  Check out the sketch below: My Take: To Create this layout I used: Crate Paper - paper pack Me & My Big Ideas: Pocket Pages - paper stickers Mambi Chips - Chipboard stickers Kaiser Craft: Love Life - photo overlays Project Life: Explore - paper clip Mermaid Party Cricut Cartridge - shells Disney: Princess Dreams Come True Cricut Cartridge - clam shell and Sebastien Nursery Rhymes Cricut Cartridge - title font twine I also entere

Autumn Challenge #310

Image
 Happy Monday and welcome to another Monday challenge! Challenge # 310 -Fall Season Make a project about the fall (sports, leaves, etc)! This Weeks Sponsor Dreaming Tree SVG's The winner will receive a $20 Gift Certificate! To qualify for the prize, be sure to use at least 1 Cricut cut on your project and if it's not obvious, let us know what cartridge you used. If you use a Cricut Explore machine, at least one cut must be from the Cricut catalog of images. If it isn't a card, you will get two entries into the drawing! Here is my project- To Create this card I used: DCWV - Modern Meadow paper stack Cricut Cartridges: Sentimentals - scalloped tag Disney Mickey and Friends - leave border Thanksgiving - corn cluster Bits and Pieces - banner A Child's Year - font on banner Twine Now it's your turn to play along! Thank you for stopping by! Blessings,

4 Layouts 2 Pieces of Paper

Image
My biggest challenge in scrapbooking is using double sided pattern paper. Often times I just don't buy it because it is difficult for me to use. I love both sides, so which do I use, or do I have to buy double every time -which sometimes just doesn't work with my "budget". Ha ha, scrapbooking budget - that's funny. Well, my husband doesn't think so - which is very unfortunate, so careful I must be! Well, when it comes to specialty paper that I get for specific projects I like to make it go as far as I can -which normally means saving all sizes of the scraps to use on other pages. In this case I decided to use two pieces of paper to create a double layout. At first I was just going to cut the 4 inches off the bottoms of both and then glue to a white piece of paper to create two full layouts. And then it occurred to me to try and make it so I could scrap a page on all sides of the paper. So, using washi tape I taped the pieces of paper together - running the